INTRODUCTIONCreating Pages and Posts
SECTION 01Creating Pages
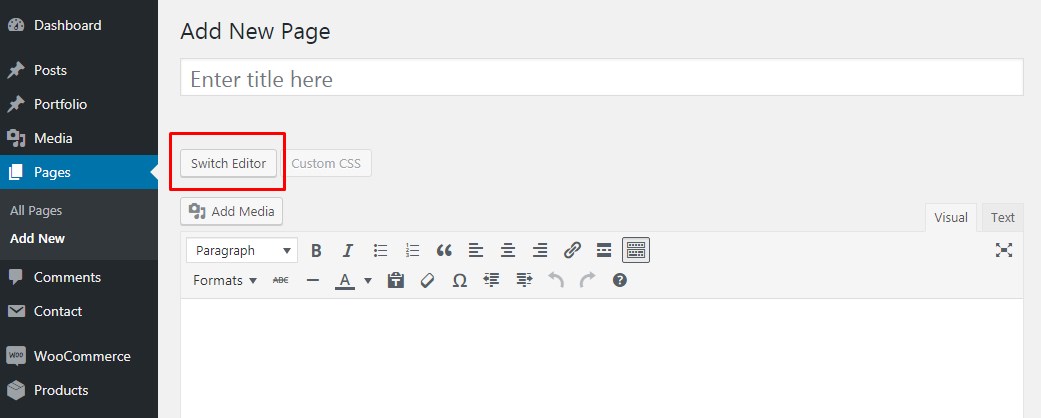
To create a new Page you need to follow these steps:
- Navigate to Pages in your wp-admin sidebar and click Add New option.
- Input a new name for your page, then enter the content using Bold Builder.
- Set page settings and add Override Global Settings if needed.
When you create a page you will see Switch Editor button. If you do see classic WordPress’ HTML editor, please click Switch Editor button to get Bold Builder editor.
SECTION 02Bold Builder Toolbar
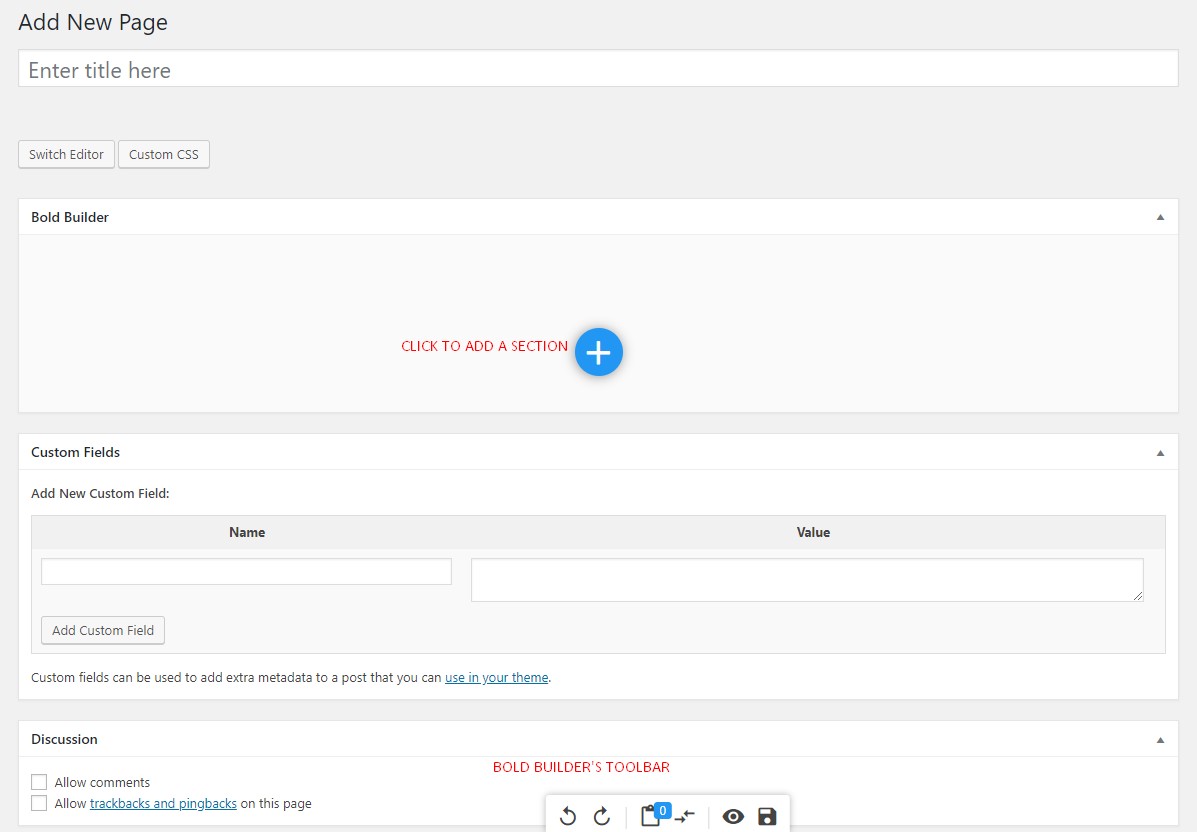
In the lower part of the screen you can see Bold Builder main toolbar. Main toolbar options are:
- Undo – you can undo your changes to page layout using this button.
- Redo – you can redo your changes to page layout using this button.
- Paste – you can paste clipboard contents to the bottom of the page layout. Just next to the paste button you can see a number which represents the number of items currently present on the clipboard.
- Clipboard Manager – This is unique feature of Bold Builder. You can easily copy and paste contents between different web sites. More info can be found in the section below.
- Preview – the same as Preview button on the Page edit form – by clicking on it you can preview the current page layout.
- Save – the same as Update button on the Page Edit Form – updates the layout of the page by saving the changes.
See in action Toolbar options in the following video tutorial. Make sure to subscribe to our YouTube channel!
SECTION 03Section Options
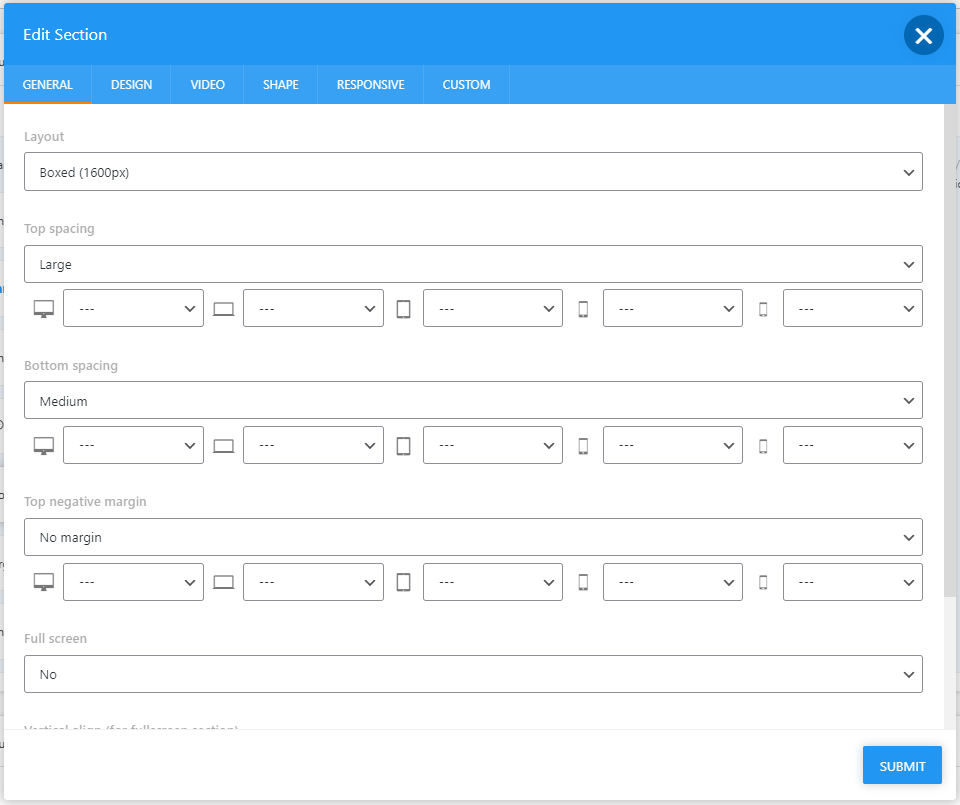
General settings:
- Layout – here you can select the width of the section.
- Top / Bottom spacing – set the top and bottom padding of the section.
- Top negative margin – set the section’s top negative margin.
- Full screen – if full screen is selected, section will take up full viewport of the browser. Top and bottom spacing will be ignored.
- Vertical align (for full screen section) – set the content’s vertical align when the section is set to full screen.
- Lazy load background image – defer the loading of background image on a page.
Design settings:
- Background overlay – here you can set the overlay of the section’s background.
- Color scheme – select the content’s color scheme. If there is no custom background color or image set, section’s background will adjust to background of the selected color scheme.
- Background color – set the section’s background color. Color won’t be visible if the background image is selected.
- Background image – set the section’s background image.
- Parallax – set if the section will have parallax or not. If the field is left empty, section will not have parallax, and if the value is added, the parallax will work.
- Parallax offset in px – set the section’s offset.
- Background parallax zoom start / end – set the background image to zoom in and out on scroll.
- Background parallax blur start / end – set the background image to blur in and out on scroll.
- Background parallax opacity start / end – set the background image to change opacity on scroll.
- Top / Bottom Section Coverage Image – set the images that will display on top or bottom of section.
- Shape – select the section’s shape.
- Top & Bottom Cover image position – select if the cover images will display above or under the section content.
Video settings:
- YouTube background video – paste the video’s URL to set it as a background.
- Video settings – set desired settings for the video. You can find settings on the following link.
- MP4 / OGG / WEBM background video – paste the video’s URL to set it as a background.
- Show video on mobile devices – select if the video will be loaded on mobile or not. If it’s disabled add background image to the section.
Shape:
- Shape – select the shape of the section (note that you need to select color scheme and / or background image).
- Top left / right, Bottom left / right – select which section corner will display in previously selected shape.
Responsive settings:
- Here you can select whether the section will be visible or hidden on certain screen sizes.
Custom settings:
- Publish / expiry date – this feature allows you to set the time and date when the section will be published or when it will expire (meaning it will no longer be visible).
- Animation – select the animation style of the section.
- Element ID – can be used to apply new CSS for that one specific element, or to create anchor links.
- Extra Class Name(s) – here you can add existing class to apply its CSS to the section, or create new class with different CSS.
- Inline style – this field is used for inline CSS that will apply to the section.
SECTION 04Row Layout
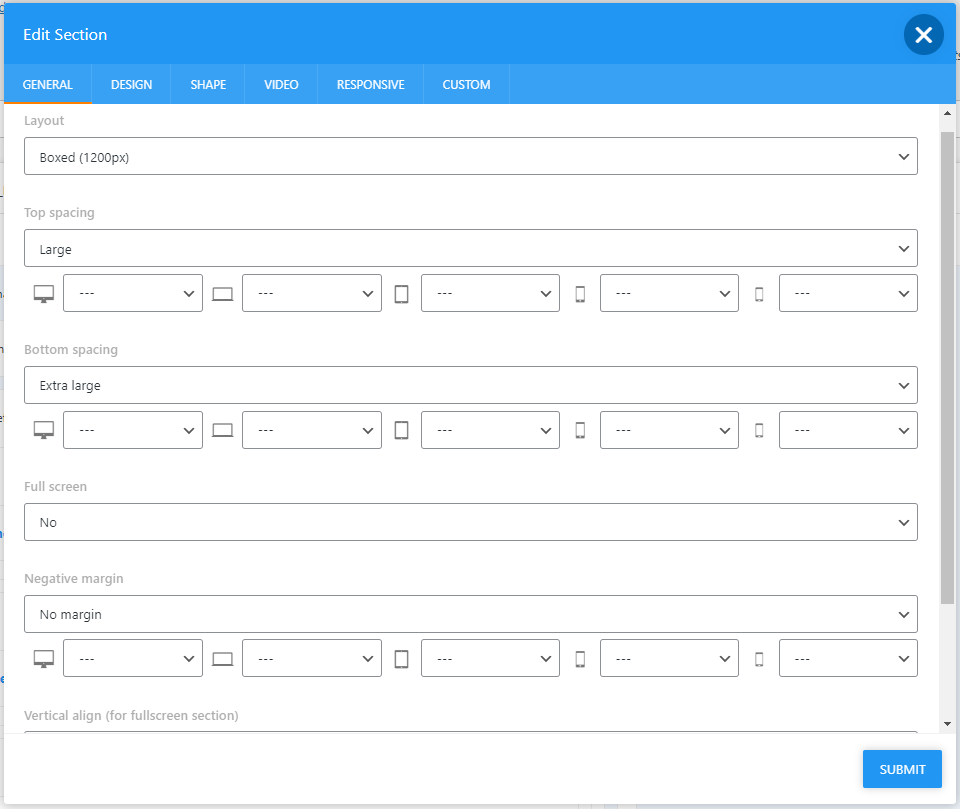
Bold Builder allows you to set the row width independently from section’s width.
Click to edit the Row element.
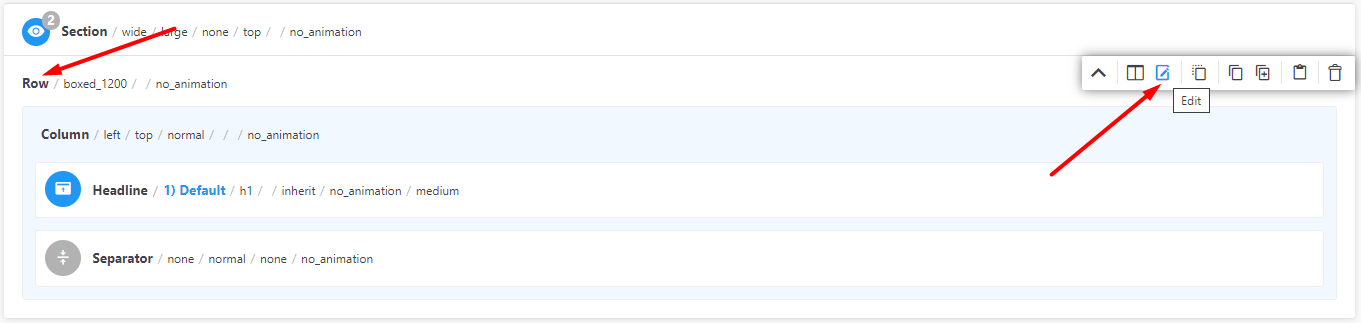
The Columns layout option (Row element → General tab) controls how wide the row is and how its columns are aligned inside that width. It has two parts:
1. Row width — the maximum content width of the row.
2. Columns structure — how the first/last columns behave within that width.
First you need to set the Row width, and its options are:
Default (wide), 1200px, 1300px, 1400px, 1500px, 1600px
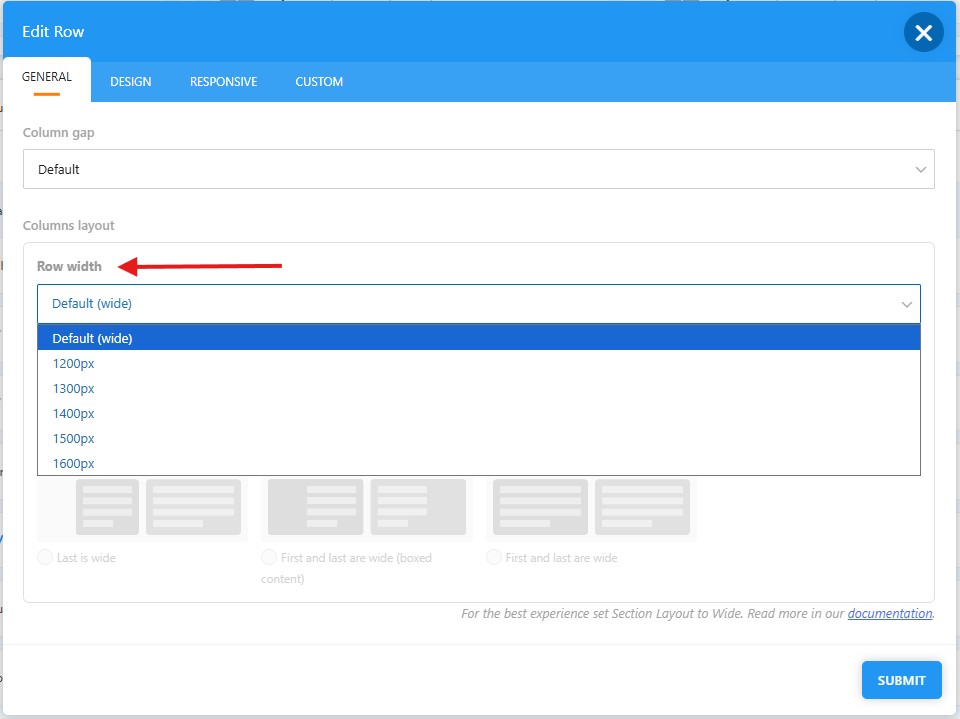
If you select ‘Default (wide)’ as row width, the row will be full-width (as the section), and the structure options are disabled.
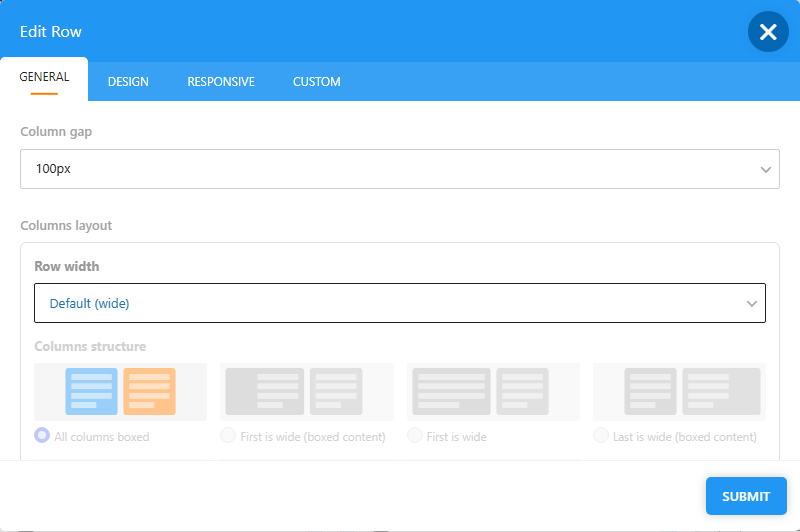
When you select one of the other width options (1200px, 1300px, 1400px, 1500px, 1600px), you’ll be able to set the column structure.
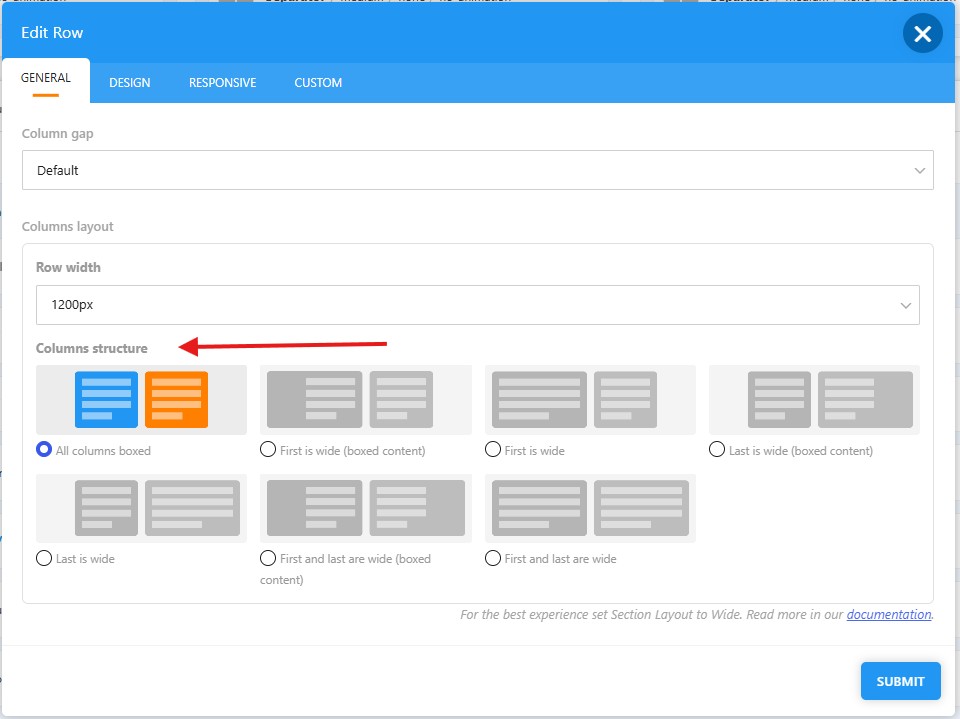
IMPORTANT NOTE:
For the best results, set the Section’s layout to ‘Wide’, then set the Row width to one of the boxed options, and only add two Columns to that Row.
SECTION 05Column Layout
Click ‘+’ in Row toolbar to add columns.
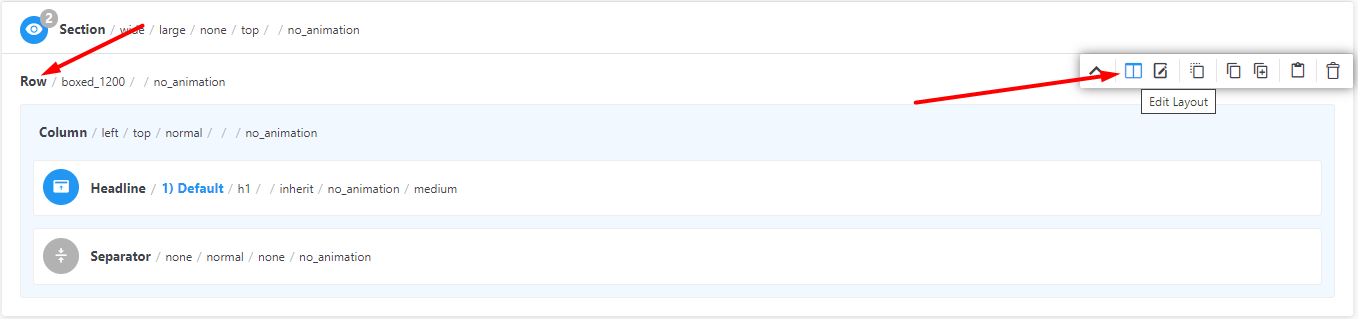
From Edit Layout dialog you need to pick wanted layout of columns, e.g. 1/2+1/2 will add two columns with same width.
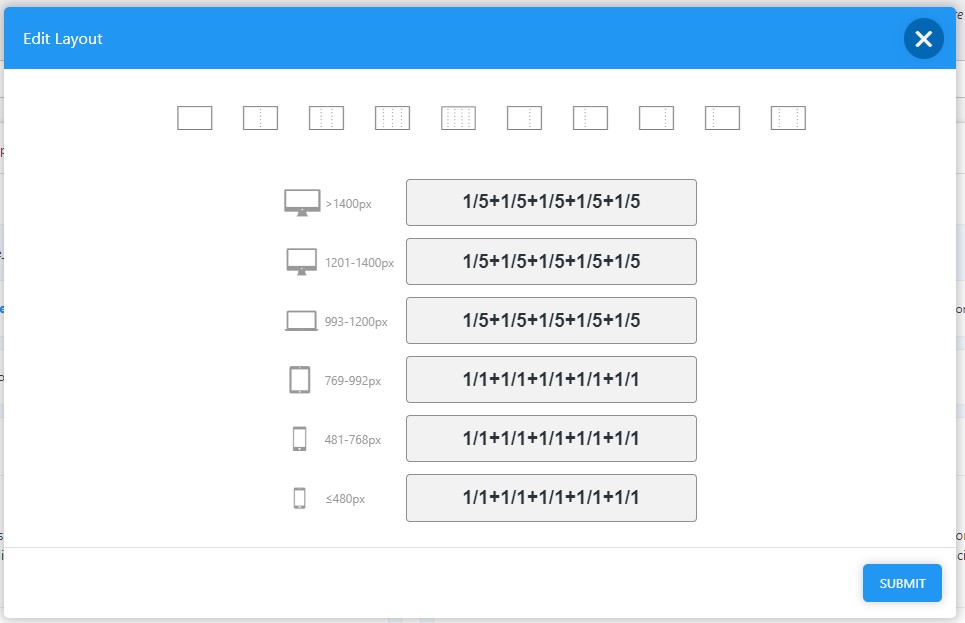
NEW FEATURE: Starting from the Bold Builder version 3.0.0, you can set different number of columns on each device (desktop, laptop, tablet, mobile).
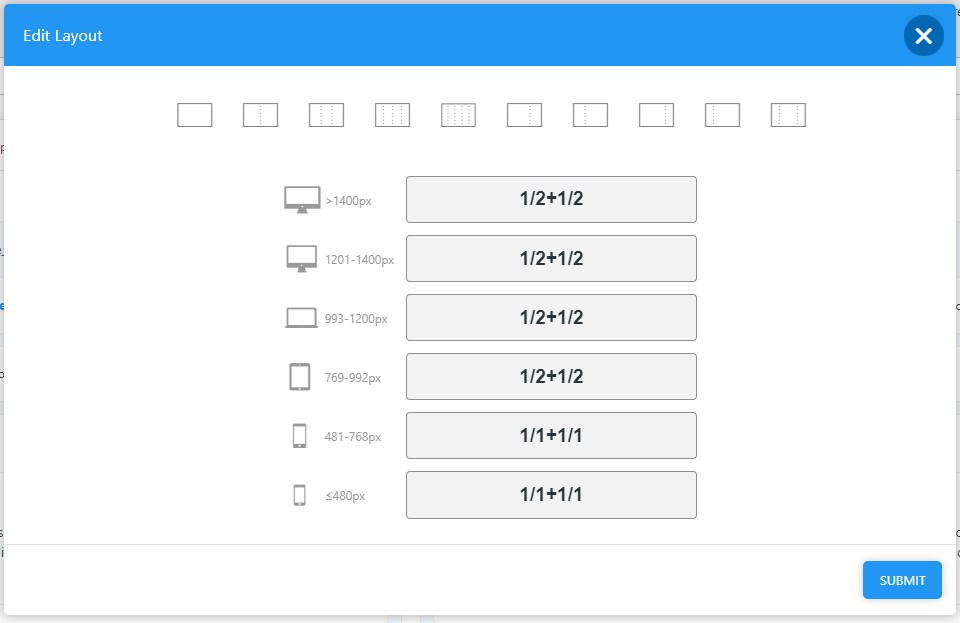
Row element is based on Bootstrap’s 12 column grid, and you can have 1, 2, 3, 4, 5, 6 and 12 columns in a row.
The most used structures are:
1/1+1/1
1/2+1/2
1/3+1/3+1/3
1/4+1/4+1/4+1/4
1/5+1/5+1/5+1/5+1/5
1/6+1/6+1/6+1/6+1/6+1/6
or combinations:
1/3+2/3
1/4+2/4+1/4
3/4+1/4
5/12+7/12
1/12+10/12+1/12
NEW FEATURE: 5 columns feature was added from 3.0.0 version of Bold Builder.
Once you select the number of columns, you can set their width as well.
For example, the following row has two columns where left column is 3/4, and right one is 1/4.
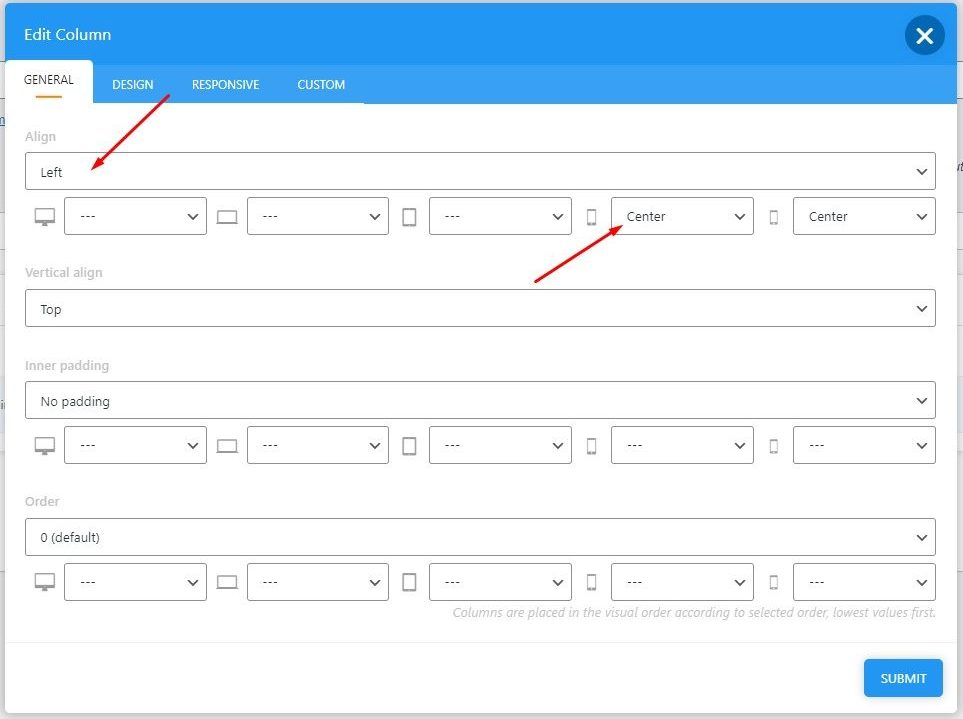
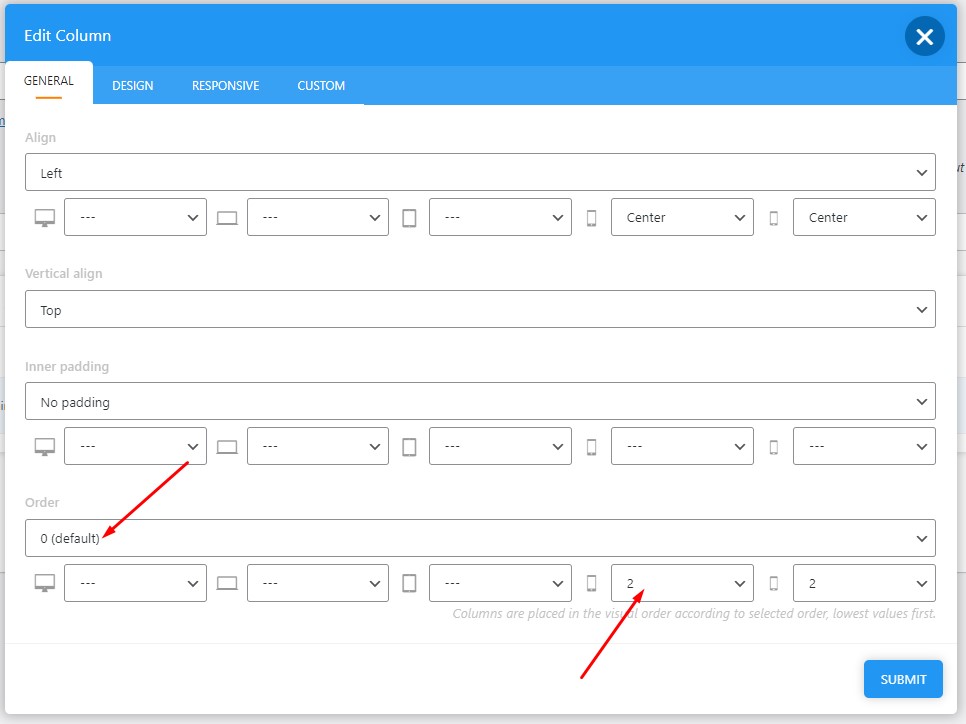
NEW FEATURE: Two new features are added to Column element (from the version 3.0.0.):
- Column alignment on mobile allows you to set different alignment depending on a device. For example, you can have column aligned left on desktop and laptop, and then center align it on tablet and mobile.
2. Second feature is column order which allows you to change order of the columns on different devices.
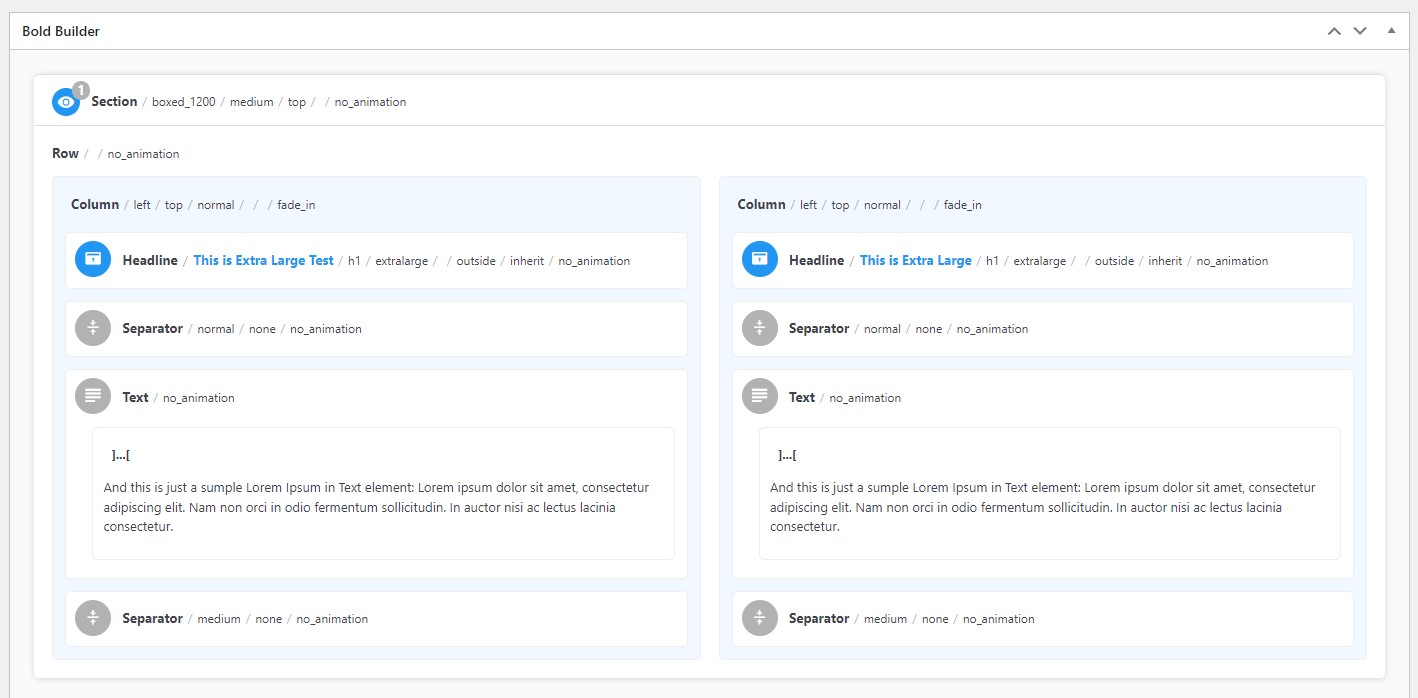
Now when you have columns, you can repeat same process to add some content to columns:
SECTION 06Drag & Drop
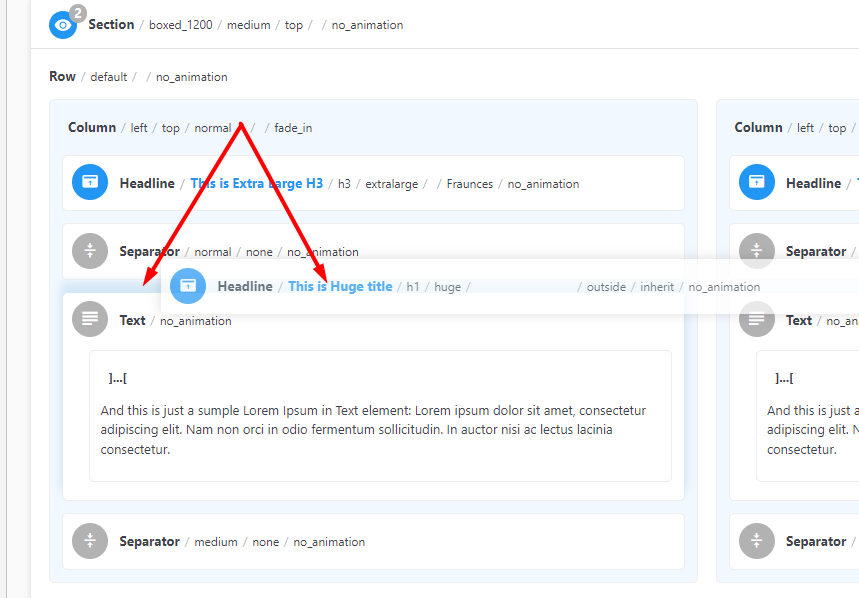
To move an element, left click on it and hold. Then start dragging it to the column where you want to place it.
You can use ‘up’ and ‘down’ arrows on your keyboard to scroll through the page.
Once you scroll to the column where you want to place the element, hover over it till you see pale blue color. The color indicates that the element can be placed there.
Please have a look at the screenshot.
Watch Drag & Drop video tutorial:
SECTION 07Edit Elements
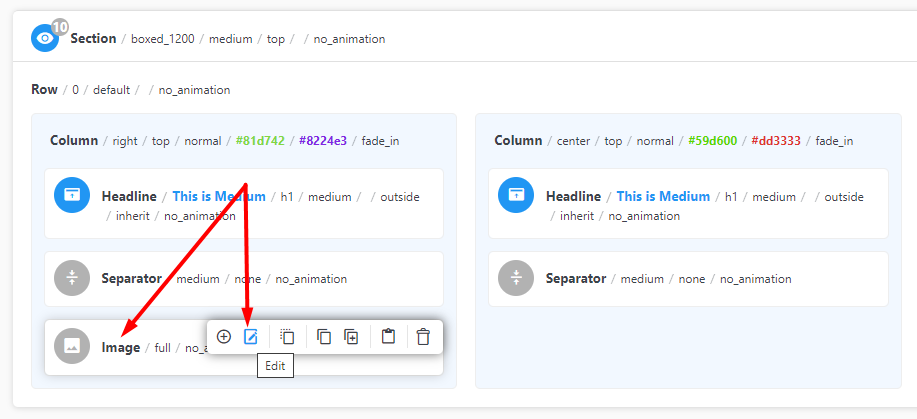
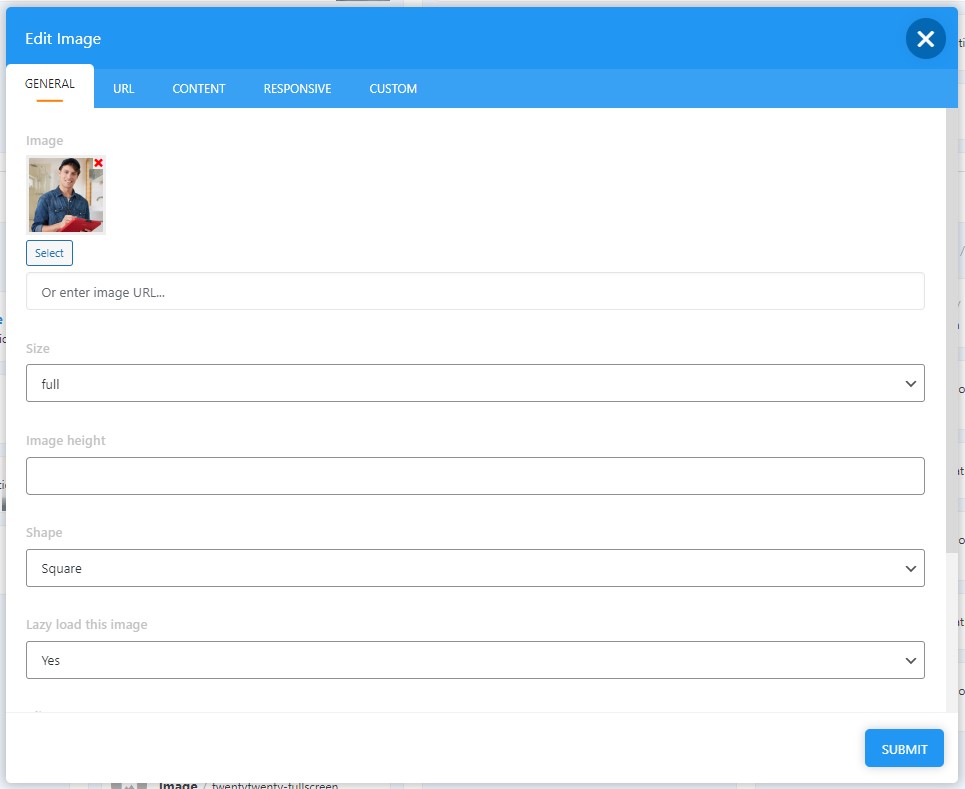
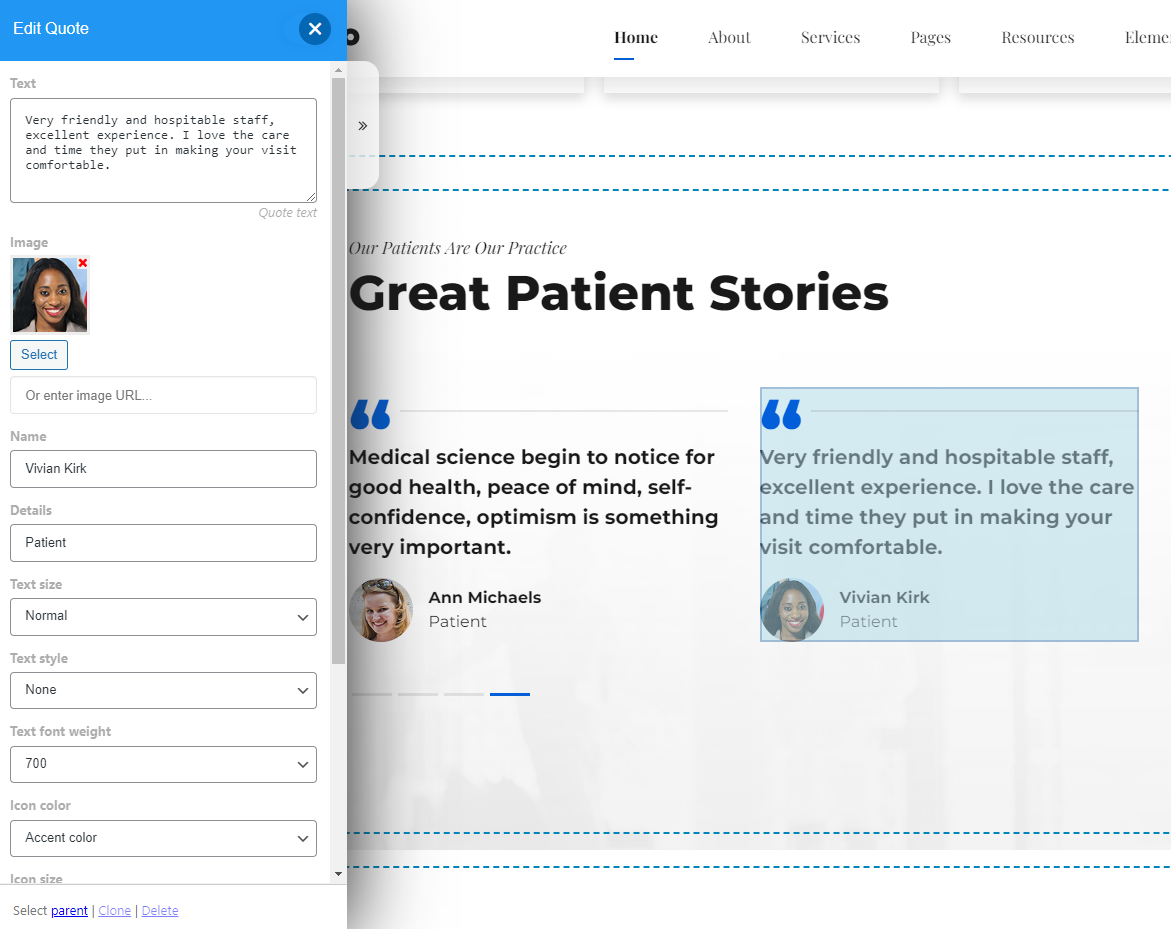
You will see Edit dialog with various options, depending on which shortcode you are editing:
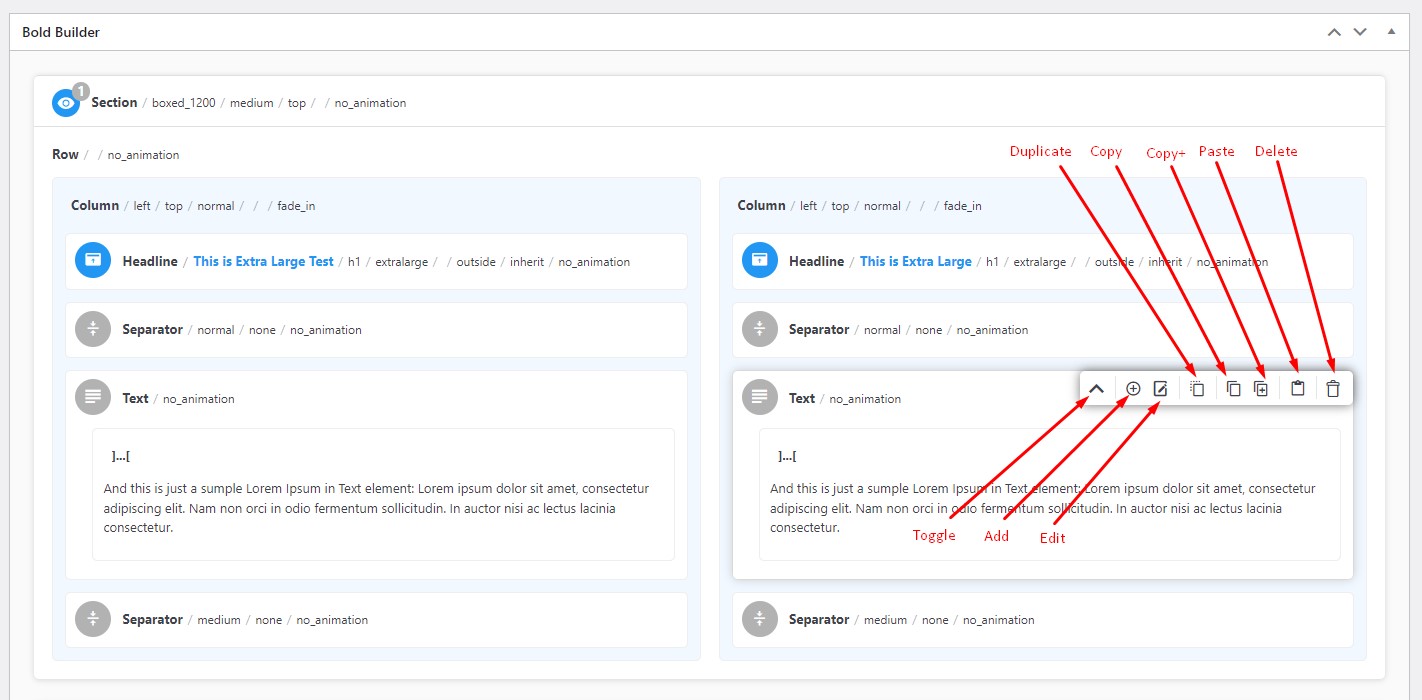
All sections, rows, columns or elements can be copied and pasted on pages.
IMPORTANT NOTE:
The best (and fastest) way to learn more about content creation and individual shortcodes (content elements) is to import demo and explore demo content – Read more.
SECTION 08Hide on Responsive / Expiry Date
Video tutorial below shows how this can be done.
SECTION 09Export Section
In order to export the section you created from one page / site, and import it to another one, please follow these steps:
1. Open page you want to copy, and click on Copy button.
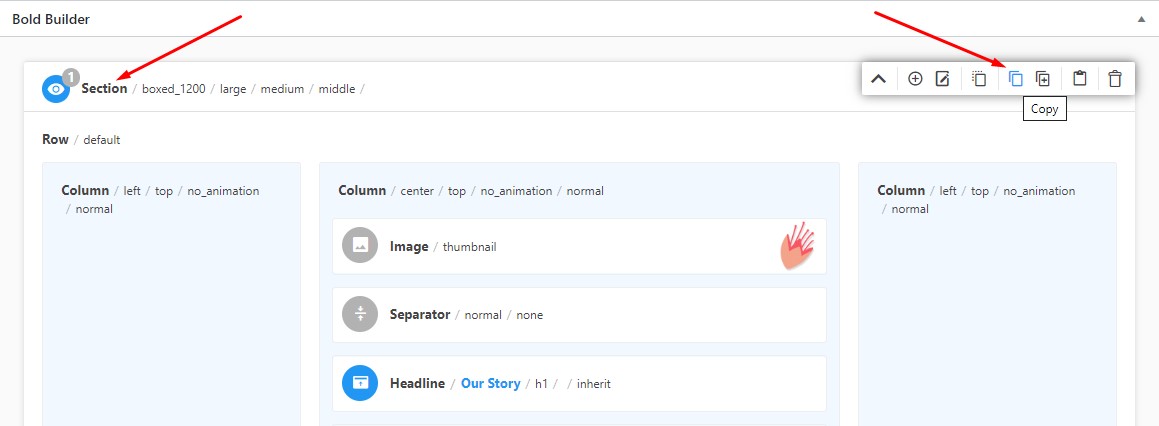
2. Then, click on the two arrows at the bottom of the screen.
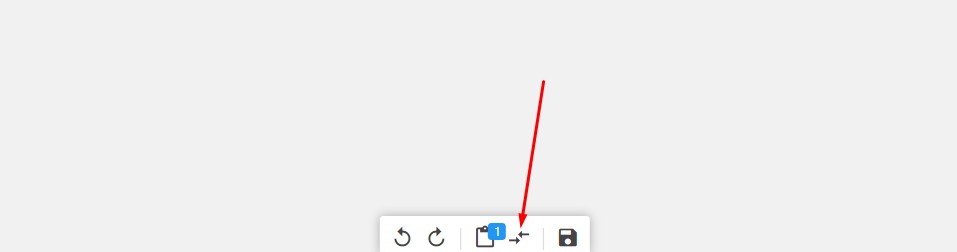
3. On the pop up that appears, click export, and copy the symbols that appear.
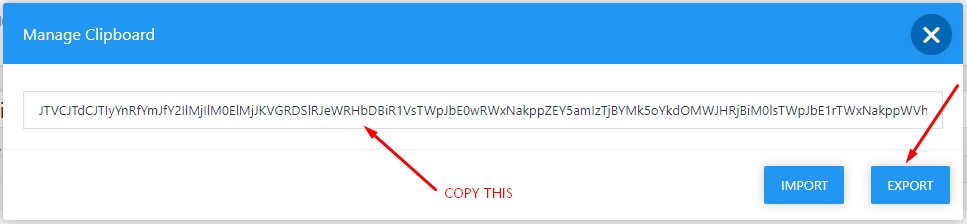
4. After that select to add new section to the page / site where you want to copy it. Click on the blue button to add it.
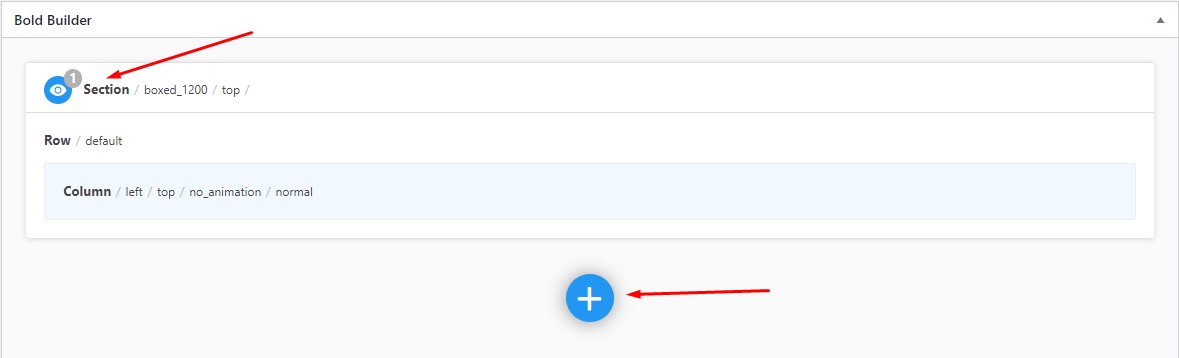
5. Then again click on the two arrows on the bottom of the screen, paste the symbols you previously copied, and click ‘Import’ button.
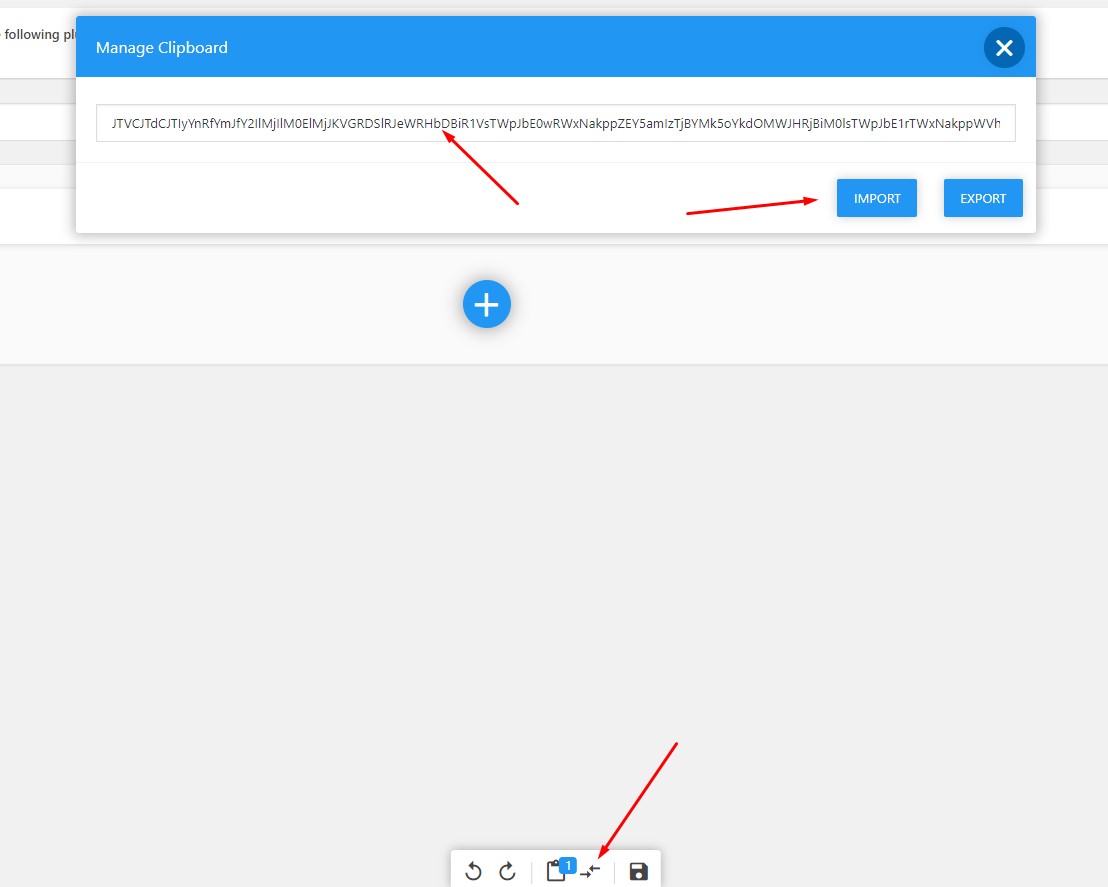
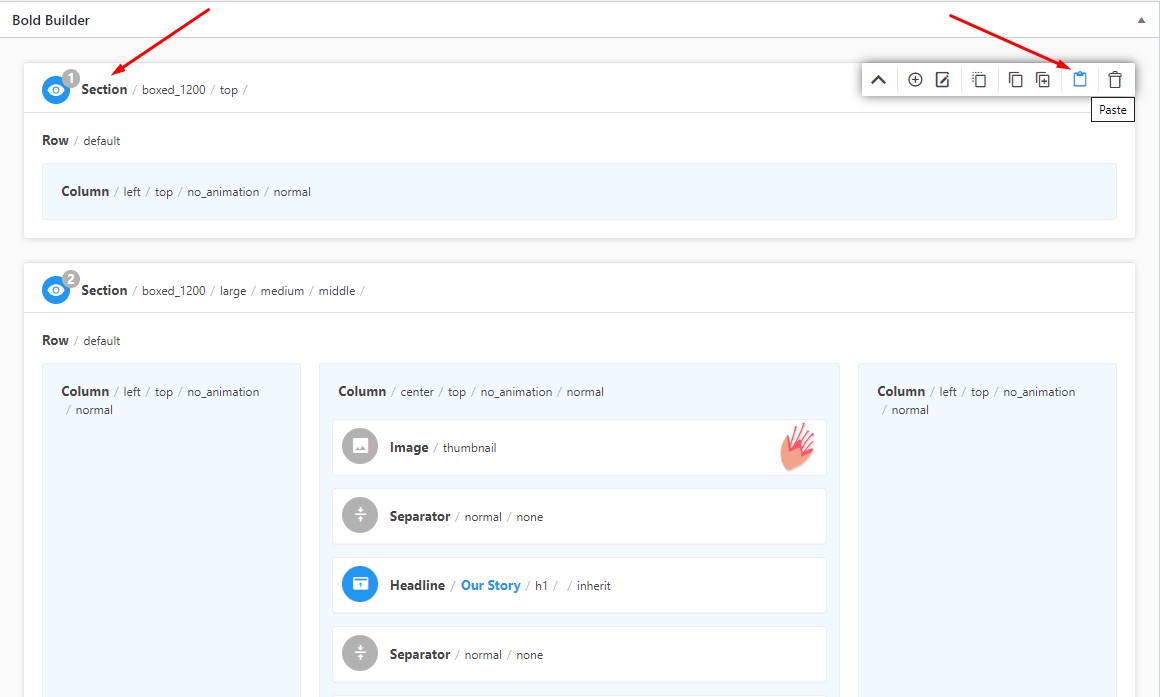
6. Close the pop up, and on the Section settings panel click ‘Paste’. Make sure to save changes and now your section should be properly copied.
SECTION 10Front-end Editor
Detailed explanation on how to work in frontend editor can be found in our Bold Builder plugin documentation – https://documentation.bold-themes.com/bold-builder/frontend-editor/.
Please note that not all element options are available to be edited on the front-end.
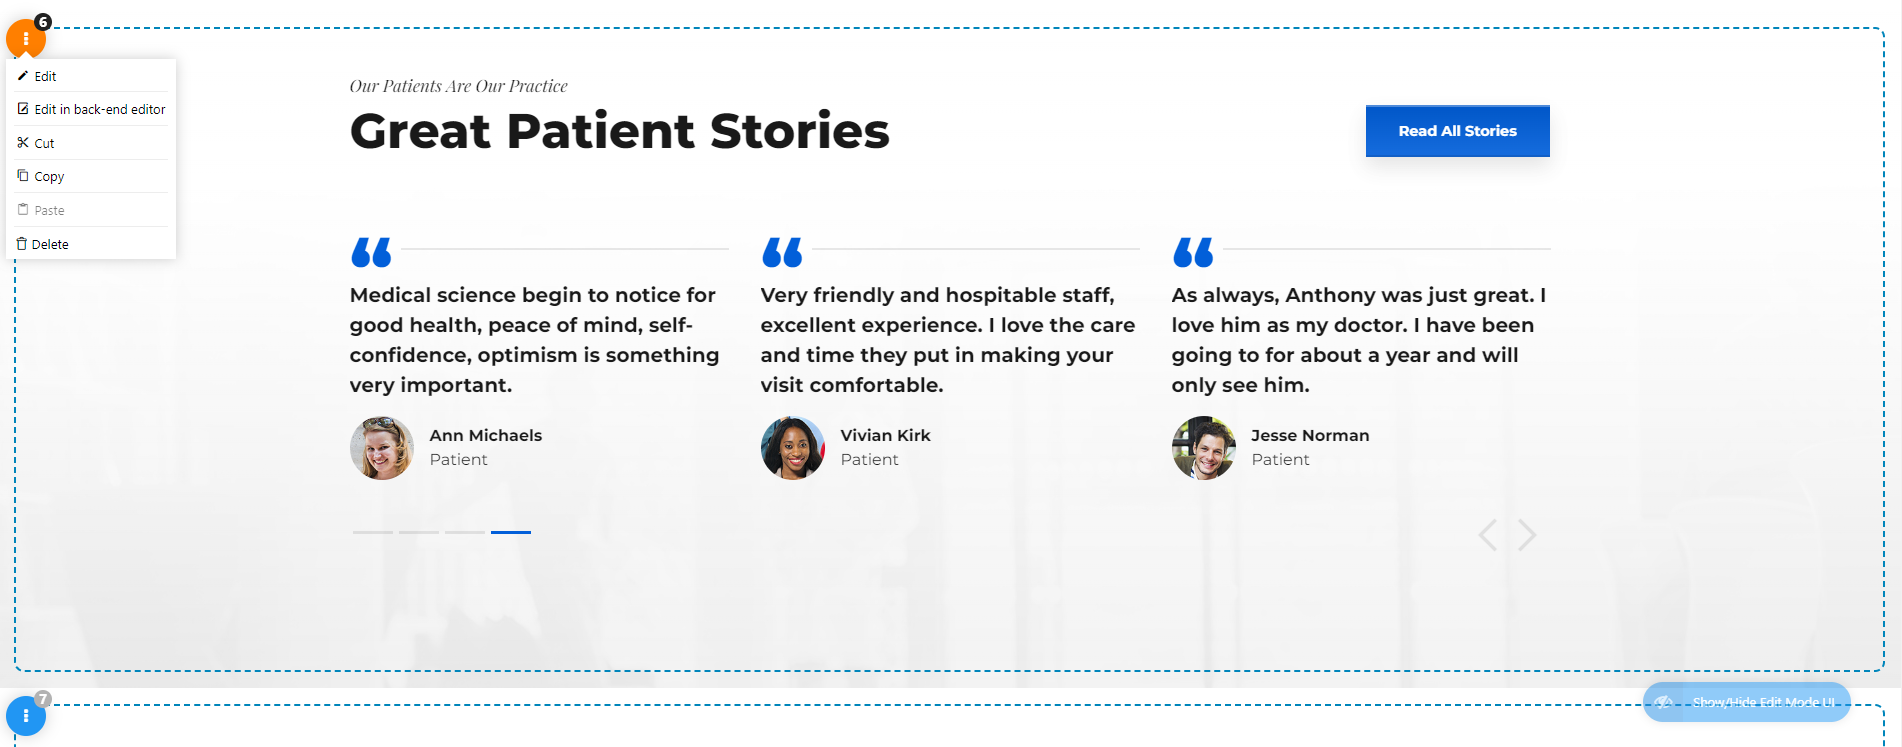
In order to see edit options for the Section element, hover over the section number (top left corner). Here is the breakdown of available options.
- Edit – clicking on this button will open front-end editor for the Section element. Please note that not all edit options are available in the front-end editor.
- Edit in the back-end editor – click on this option if you want to edit in the back-end editor. Note that if you hover over this button, you will see an option to open back-end editor in a new tab.
- Cut – click on this option if you want to cut the section from one page and paste it elsewhere.
- Copy – this option allows you to copy the section from one page to the other, or to different part on the same page.
- Paste – click on this button will paste previously cut / copied section(s) below this section. Note that if you hover over this button, you will see an option to paste section(s) above the current section.
- Delete – by clicking on this option you will delete entire section and its content.
Bold Builder elements can be edited by hovering over them.
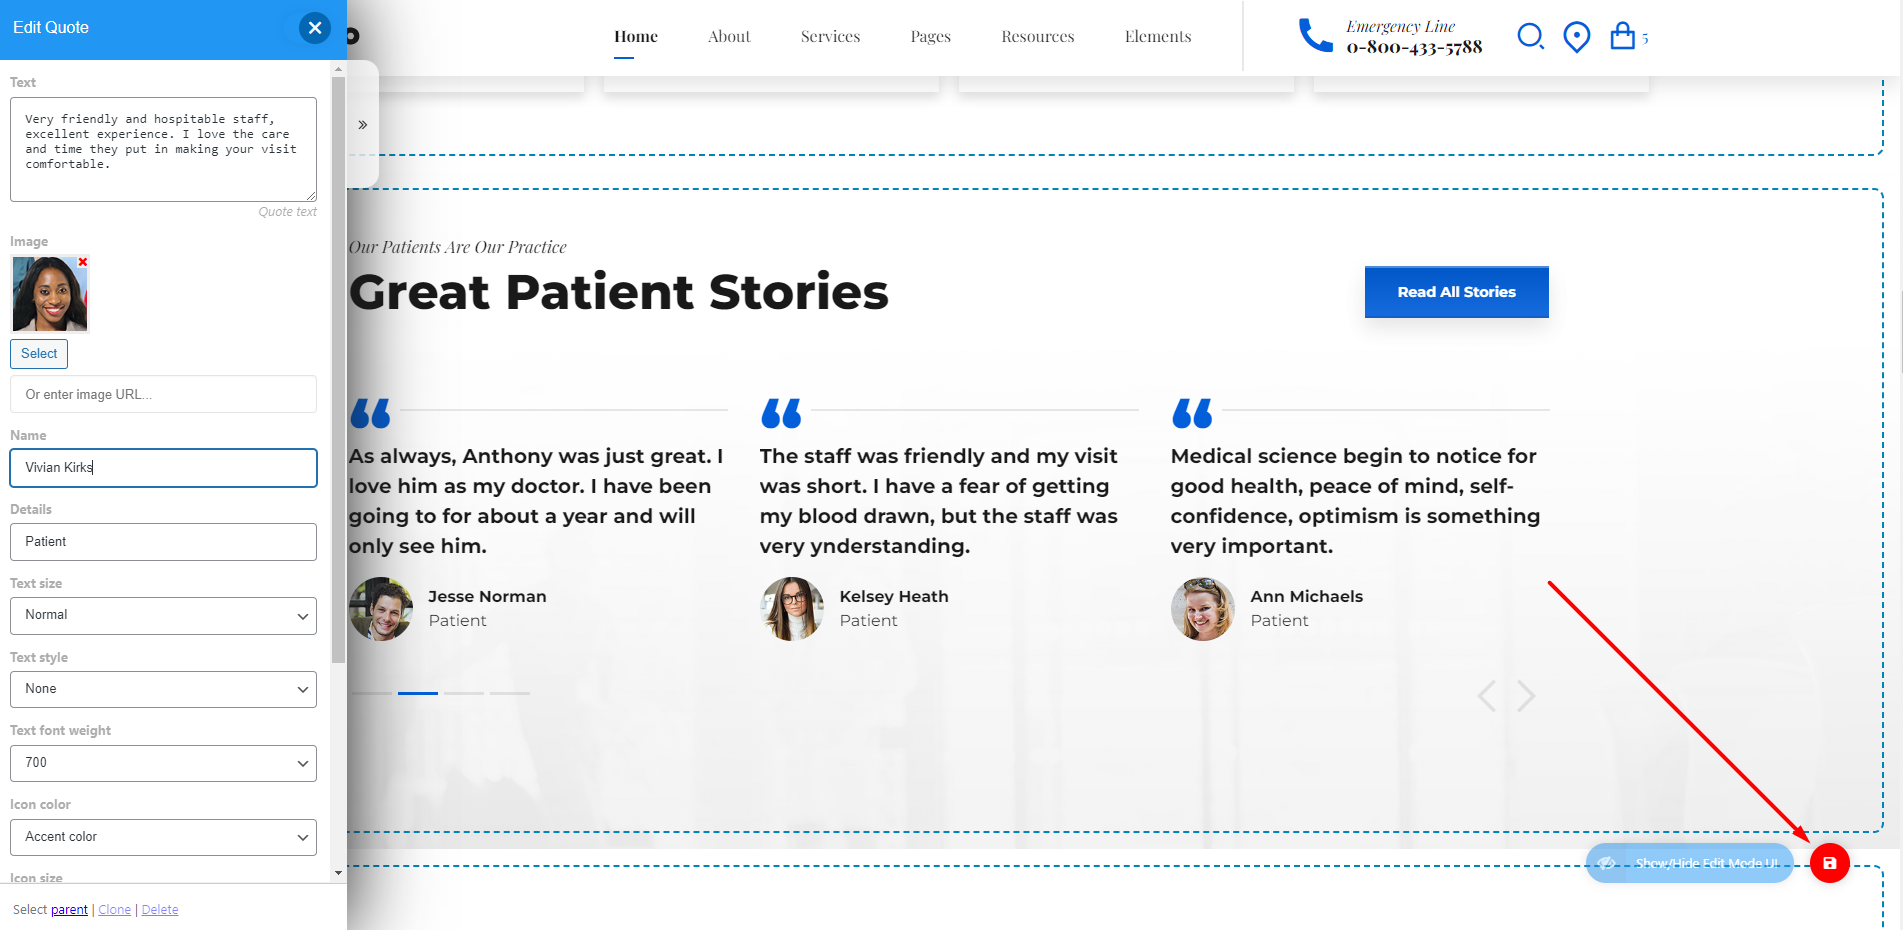
Once you make changes to the Section or any other element, save icon will appear in the bottom right corner.
In order to save the changes made on the page, you need to click on the save icon before refreshing the page or going to other pages.
IMPORTANT NOTE:
When you edit in one of the editors (back-end or front-end) you need to save changes before switching to the other editor, otherwise they won’t be saved.
E.g. If you are editing in back-end editor, first click on ‘Update’ button, and then go to front-end of the page where you can further edit in front-end editor.
SECTION 11Override Theme Settings on Pages
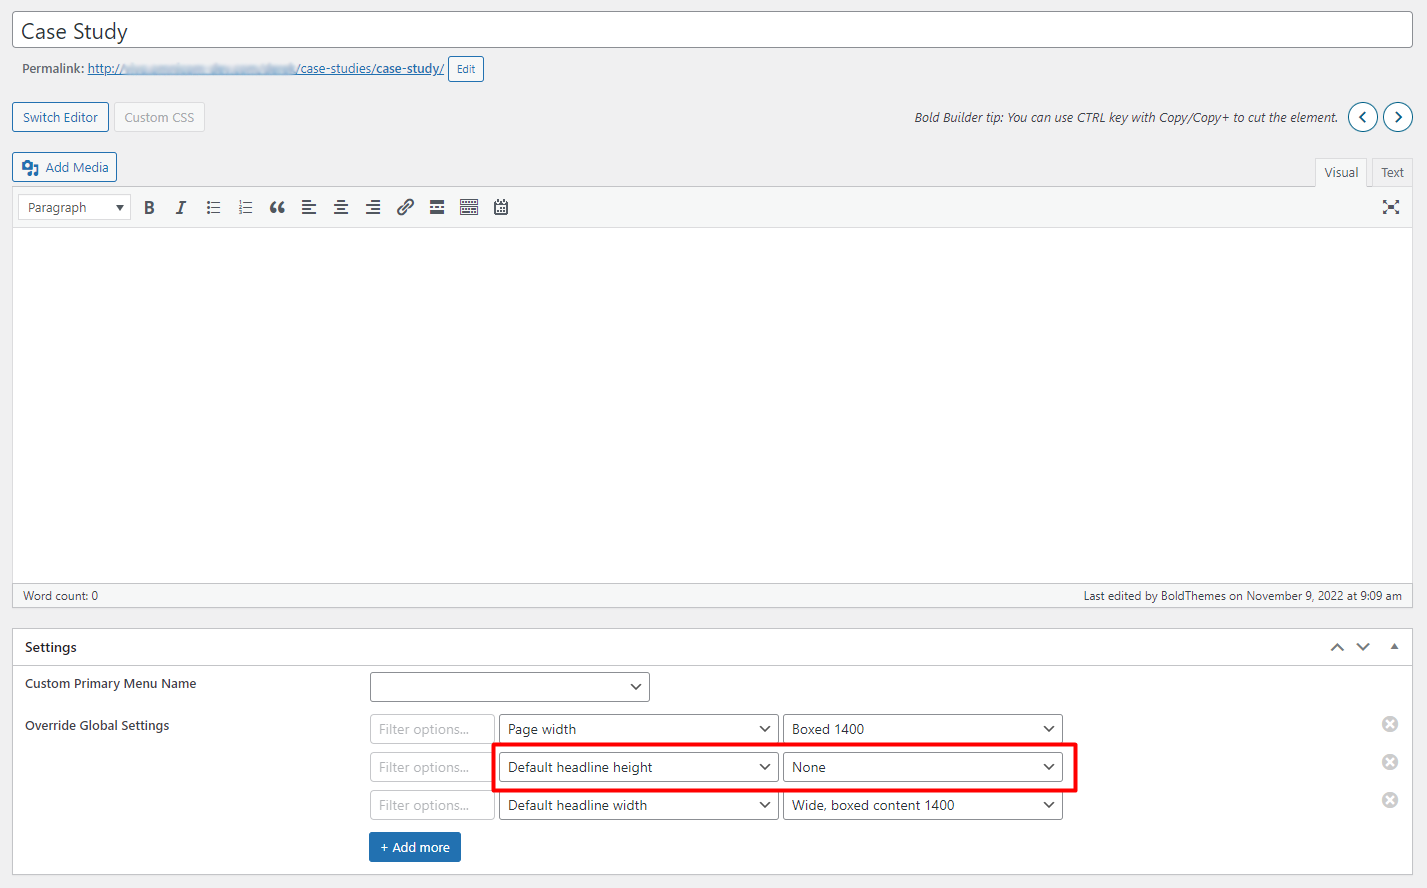
Settings panel is located at the bottom of the page in backend editor.
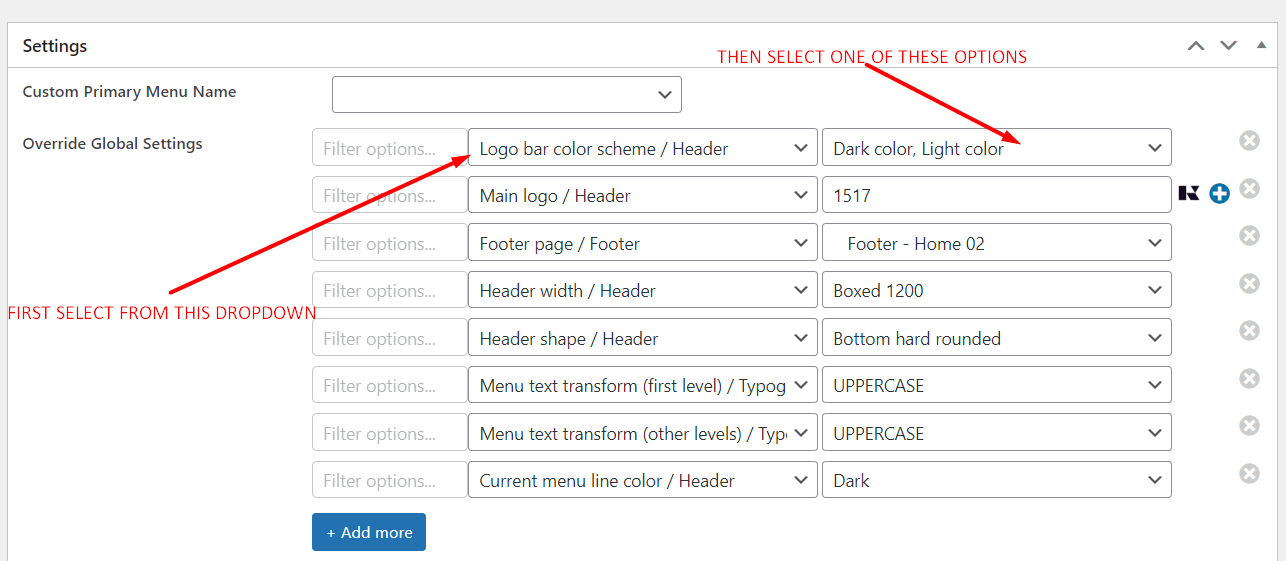
First option in Settings panel is ‘Custom Primary Menu‘ where you can select any menu from the dropdown to display on that specific page.
Here is how ‘Override Global Settings‘ options work:
First, select the setting you want to override in the left dropdown.
Second, from the right dropdown select one of the setting’s options.
*Note that in the case of logos, you need to paste image’s ID to the right field.
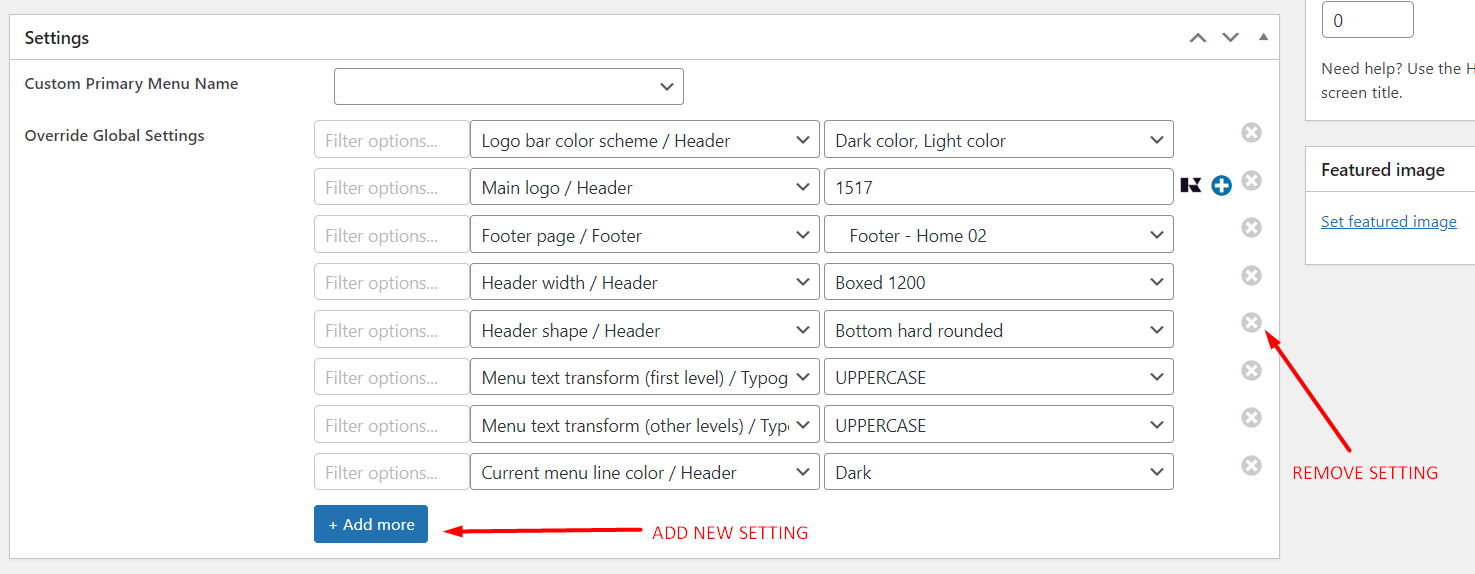
To add another setting, click on ‘+Add more‘ button.
To remove existing setting, click on the ‘X‘ button on the right side.
SECTION 12Excerpt text and Header background image
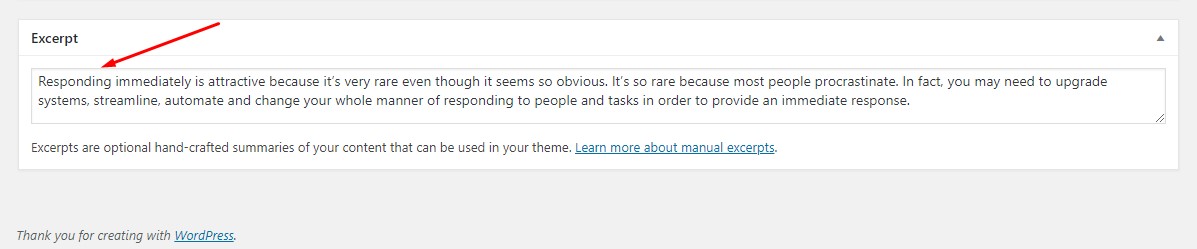
In order to edit / remove excerpt text, navigate to the Page editor, and in Screen Options (at the top of the dashboard) enable Excerpt field.

After that, scroll to the bottom of the page editor where you’ll find Excerpt text.
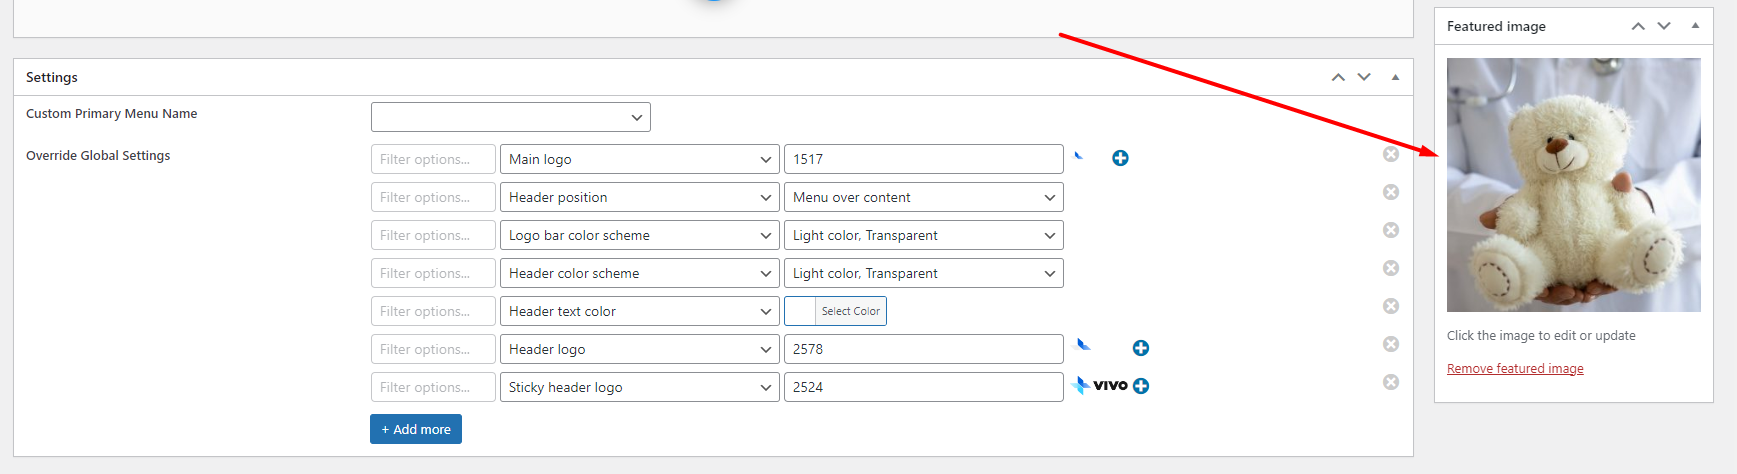
The Header background image represents featured image added to the page. In order to replace existing image with your own, click on the image, and when redirected, select image from Media Library.
In order to entirely remove the image, click on ‘Remove featured image’ button.
In order to remove entire Header from pages, make sure to select ‘Default Headline Height’ field in Appearance > Customize > Default Headline panel, or in Override Global Settings at the bottom of the page editor, and set the value to ‘None’:

SECTION 13Creating Blog Posts
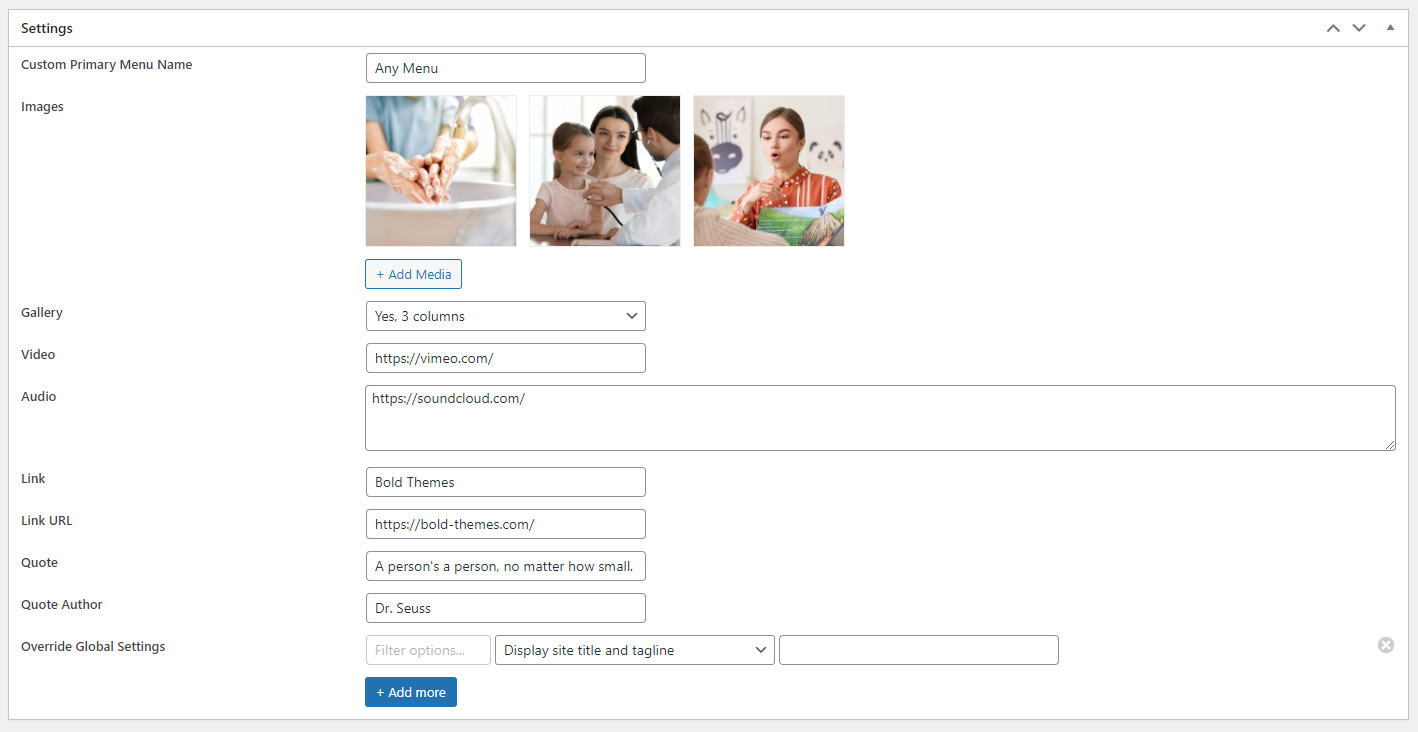
Custom Primary Menu Name
Enter name of the menu that you want displayed as the primary menu on specific post.
Images
Click Select or Upload Images to create gallery or add just a single image.
Gallery
Select if the images that you’ve added to the ‘Images’ panel on the single post will display as a gallery, and in what format (number of columns).
Video
In order to add Video post, enter Vimeo video URL, YouTube video URL or custom video shortcode in the Video field. Do not forget to check Video post format in the Format box.
Audio
If you want to create the Audio post, Audio field is where you enter audio shortcode or SoundCloud iframe embed code. Do not forget to check Audio post format in the Format box.
Link and Link URL
In order to create Link Post, enter link title in Link field and link URL in Link URL field. Do not forget to check Link format in the Format box.
Quote and Quote Author
To create quote post enter data in Quote and Quote Author fields. Do not forget to check Quote format in the Format box.
Override Global Settings
As with pages, here you can override global settings – for more info refer to the previous section “Override Theme Settings on Pages”.
ARTICLE 01FAQ
If the single posts appear as they are not formatted, and are overlapping the menu, that probably means that their template page is not set correctly.
In order to fix this, make sure that the template page (Blog single) is published, and selected as Settings page in Appearance > Customize > Blog > Blog single post panel.
In order to edit / remove excerpt text, navigate to the Post editor, and in Screen Options (at the top of the dashboard) enable Excerpt field.
After that, scroll to the bottom of the page editor where you’ll find Excerpt text.
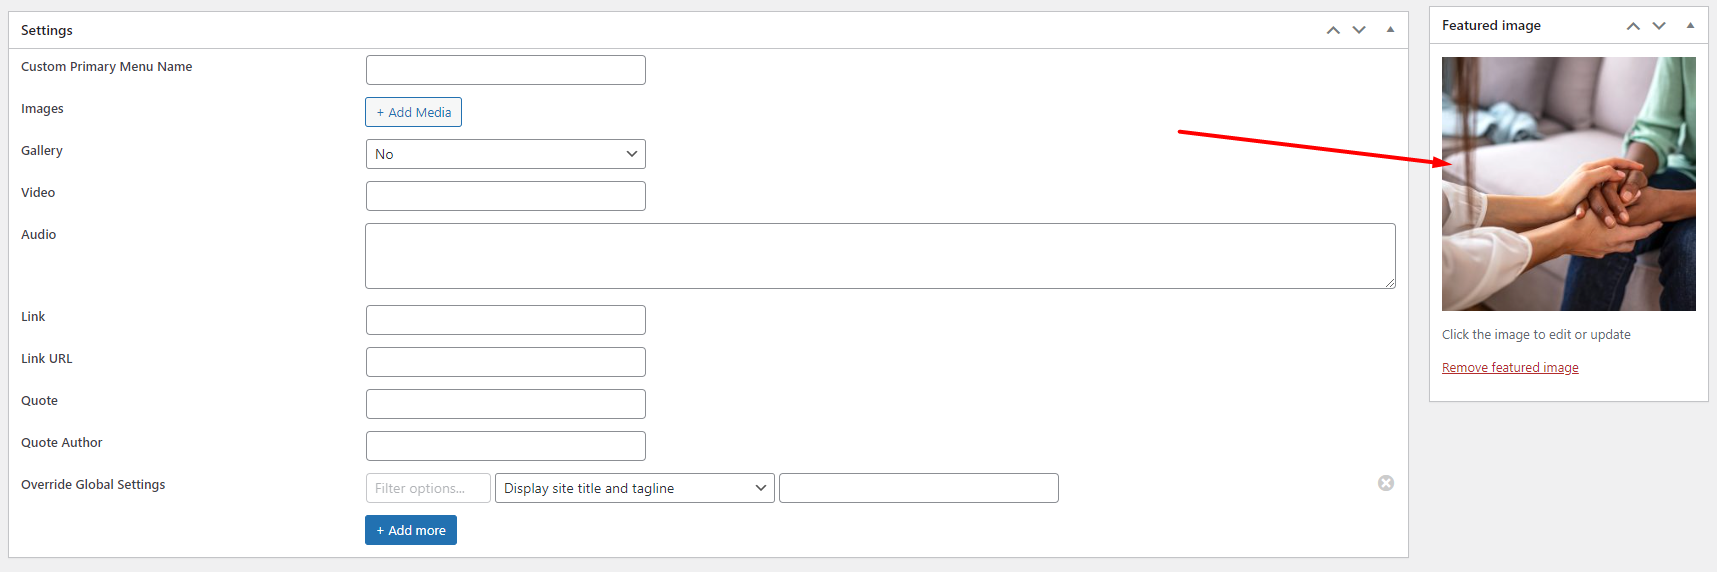
The Header background image on single posts represents featured image added to the posts or their template page (Blog single). In order to replace existing image with your own, click on the image, and when redirected, select image from Media Library.
In order to entirely remove the image, click on ‘Remove featured image’ button.
*Please note that once the featured image is added to the single posts’ template page, it will override the featured image added to the post.
In order to add sidebar to single posts, navigate to their template page (Blog single), and in Override Global Settings panel, select ‘Sidebar position’ setting, and select its position (left / right).
To remove sidebar, select ‘No Sidebar’.
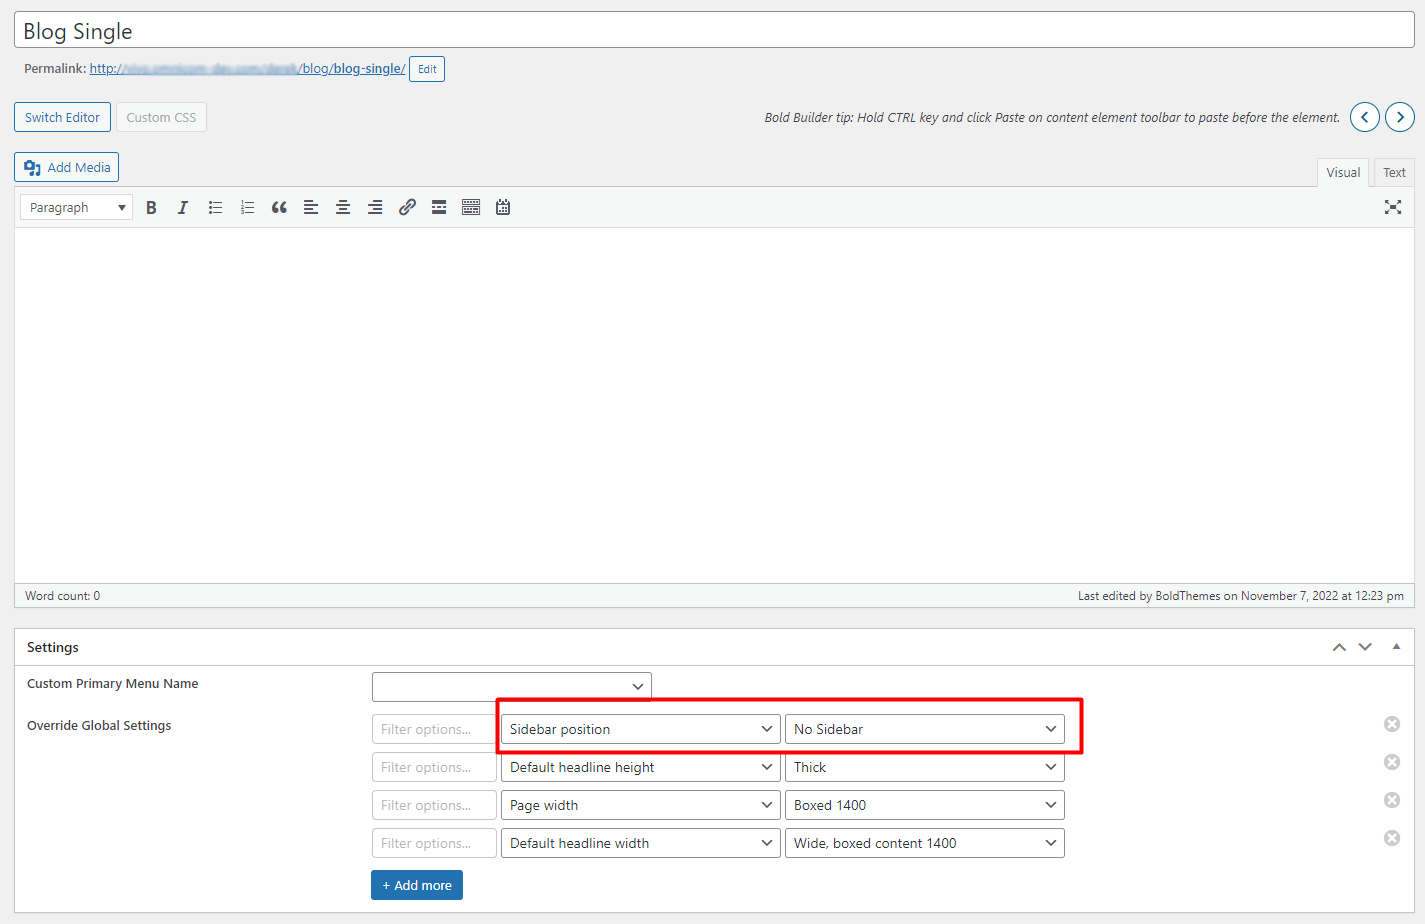
*Note that sidebar can also be displayed on selected posts, by adding it to the post’s Override Global Settings.
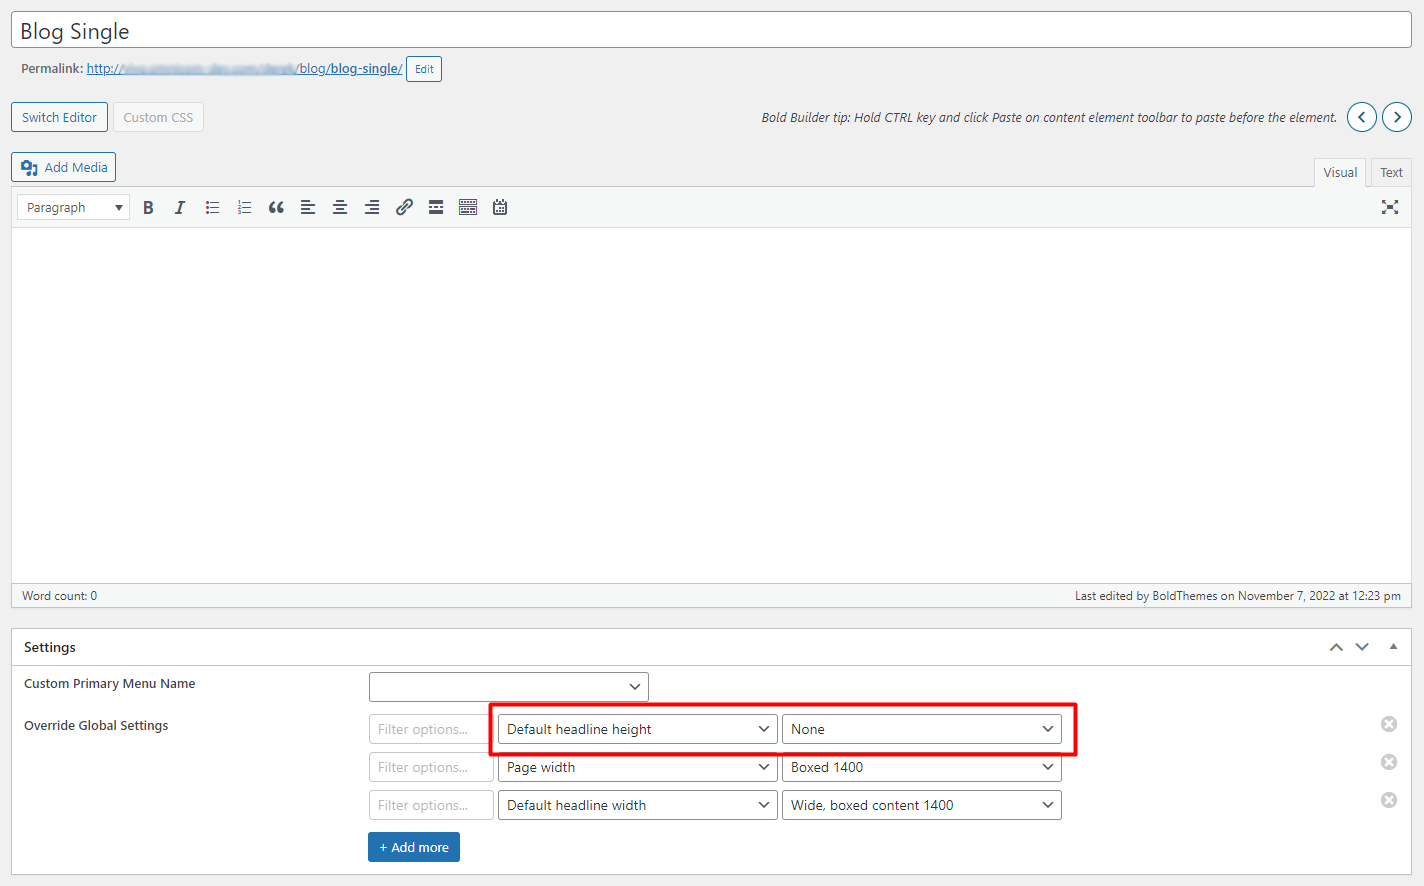
In order to remove entire Header from posts, make sure to select ‘Default Headline Height’ field in Appearance >Customize >Default Headline panel, or in Override Global Settings at the bottom of the page editor, and set the value to ‘None’:
SECTION 14Creating Portfolio Posts
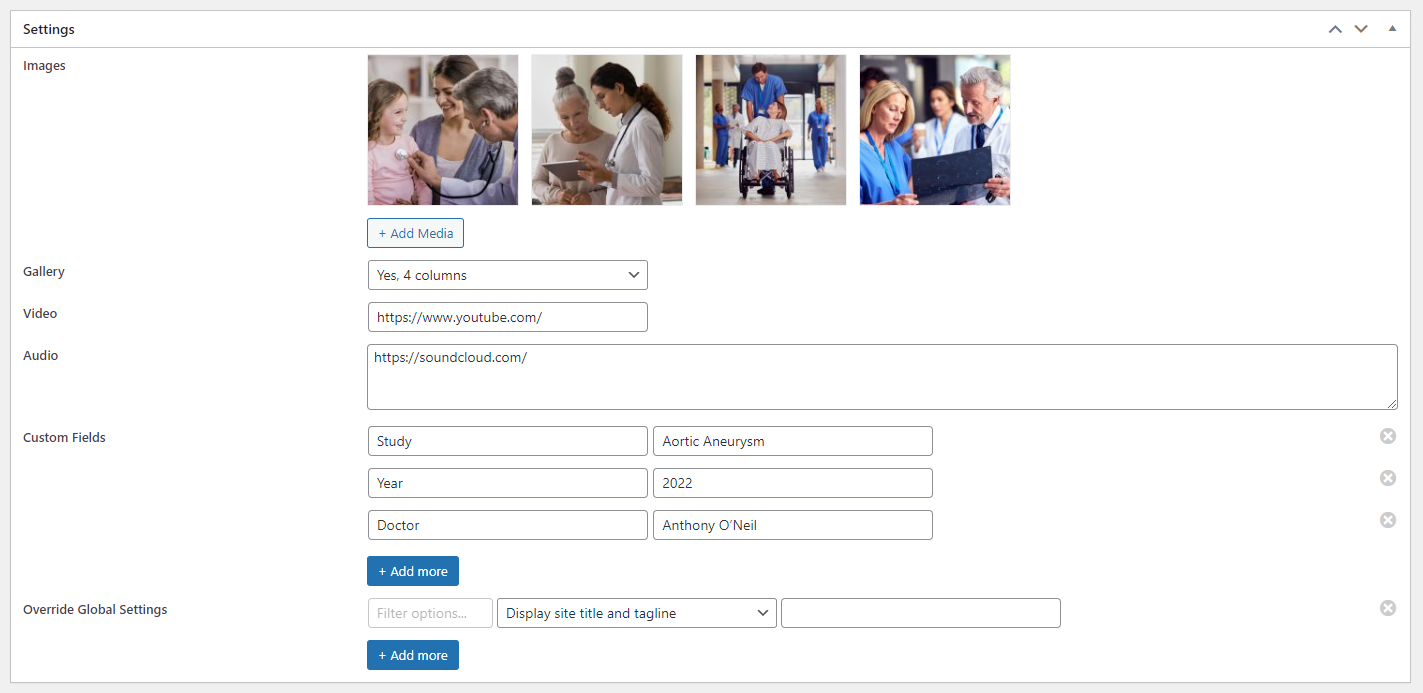
Images
Click Select or Upload Images to create gallery or add just a single image.
Gallery
Select if the images that you’ve added to the ‘Images’ panel on the single portfolio will display as a gallery, and in what format (number of columns).
Video
In order to add Video post, enter Vimeo video URL, YouTube video URL or custom video shortcode in the Video field.
Audio
If you want to create the Audio post, Audio field is where you enter audio shortcode or SoundCloud iframe embed code.
Custom Fields
Enter any number of key/value pairs, e.g. Year/2015, etc.
Override Global Settings
As with pages, here you can override global settings.
ARTICLE 02FAQ
If the portfolio posts appear as they are not formatted, and are overlapping the menu, that probably means that their template page is not set correctly.
In order to fix this, make sure that the template page (Portfolio single) is published, and selected as Settings page in Appearance > Customize > Portfolio > Portfolio single post panel.
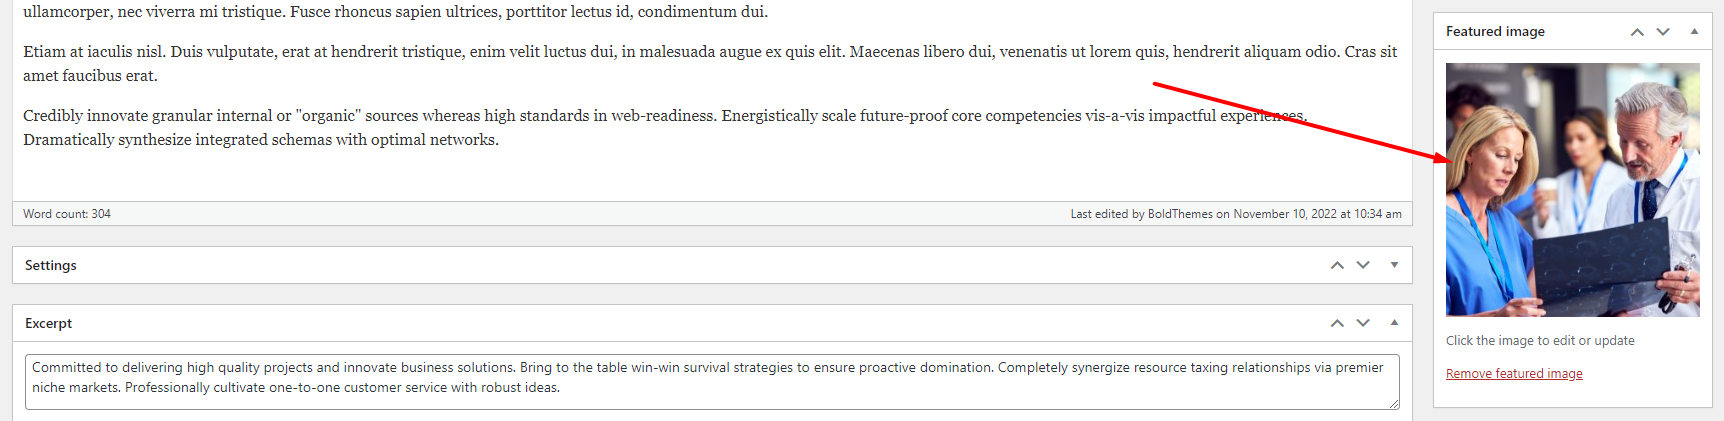
In order to edit / remove excerpt text, navigate to the Post editor, and in Screen Options (at the top of the dashboard) enable Excerpt field.
After that, scroll to the bottom of the page editor where you’ll find Excerpt text.
The Header background image on portfolio posts represents featured image added to the posts or their template page (Portfolio single). In order to replace existing image with your own, click on the image, and when redirected, select image from Media Library.
In order to entirely remove the image, click on ‘Remove featured image’ button.
*Please note that once the featured image is added to the single portfolio posts’ template page, it will override the featured image added to the post.
In order to add sidebar to portfolio posts, navigate to their template page (Portfolio single), and in Override Global Settings panel, select ‘Sidebar position’ setting, and select its position (left / right).
To remove sidebar, select ‘No Sidebar’.
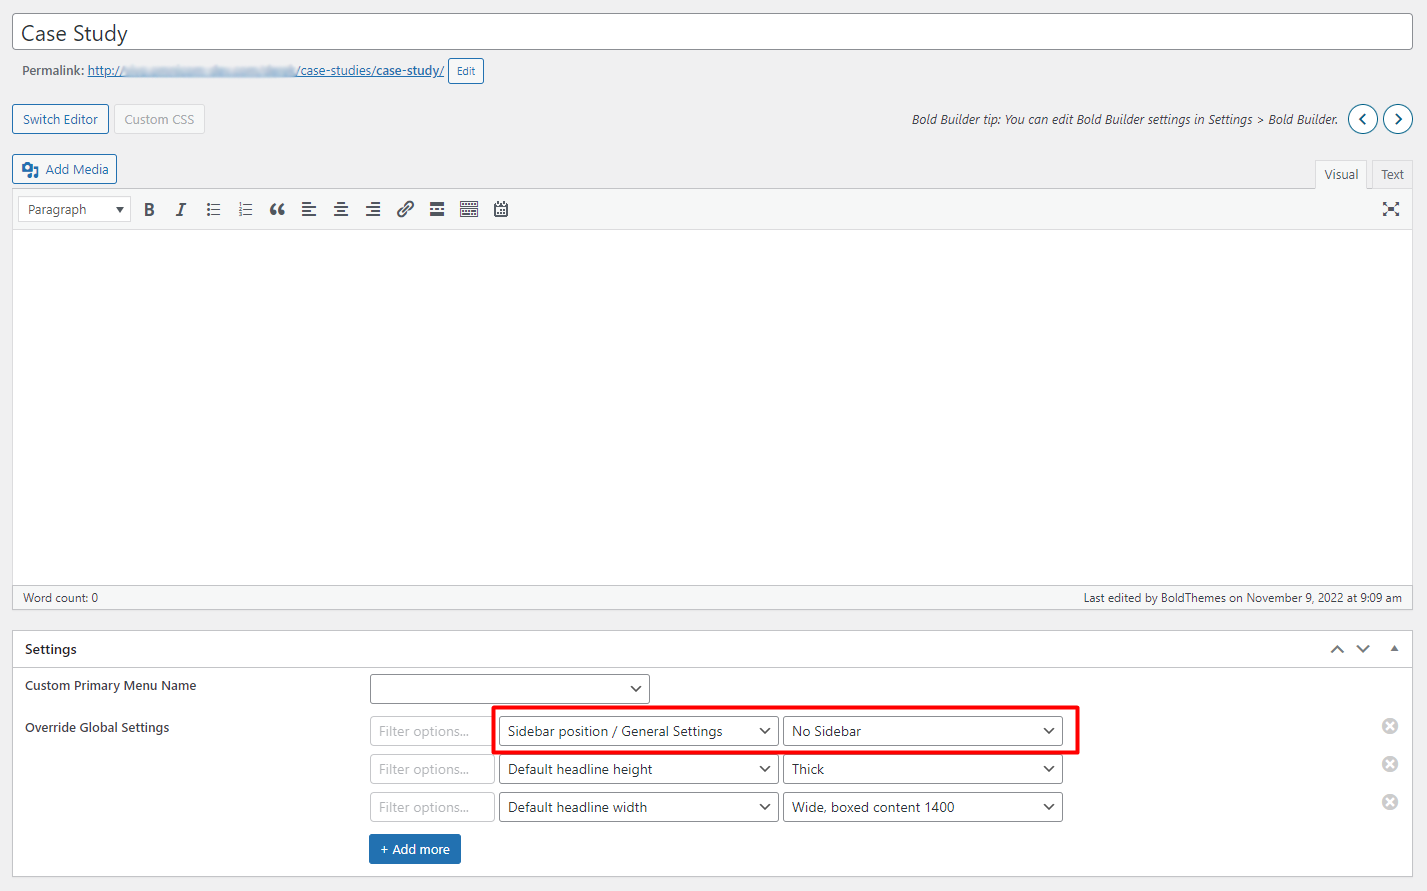
*Note that sidebar can also be displayed on selected posts, by adding it to the post’s Override Global Settings.
In order to remove entire Header from portfolio posts, make sure to select ‘Default Headline Height’ field in Appearance >Customize >Default Headline panel, or in Override Global Settings at the bottom of the single portfolio editor, and set the value to ‘None’: